Showing posts with label craft. Show all posts

Sunday, October 20, 2013

Prepping My (Online) Store

After a bit of an online hiatus, I finally was able to decide on a storefront.  It took a while to reassess my inventory and get them posted.

I posted on Storenvy for a while, and then did some more thinking.  I listed out some of the pros and cons of Etsy a few months ago, but wasn't sure about Storenvy.

What I loved: Customization.  Storenvy is highly customizable, and easy to figure out.  I had a lot of fun playing with the HTML code and making the page match my blog.  I was able to put an interactive tab on my Facebook page and easily spread the word about each product.

Less than awesome: Over the course of a few weeks, I discovered that the only traffic to my listing was traffic that I drove.  This would have been fine for some but while I'm still working full time, I depend an pre-existing community.

So, after some thinking and exploring, I have returned to Etsy.  Luckily, in my time away, Etsy has made some cool updates to their service. Next, it's time to work on some more pottery!

Wednesday, June 19, 2013

Book binding || Wedding guest book

I was recently a bridesmaid in a good friend's wedding, and I had the pleasure of putting together the guest book for her big day!  I used some of the techniques I learned in college for book making, and I am super please in how it turned out.  

To make the cover, I had to gather some decorative papers, as well as a heavy cardstock/card board.  I ended up finding a heavy matte board that did the trick.  Also, needed is a cutting surface, a metal ruler, spray adhesive and an exacto knife. 

Once I cut the matte board to size, I cut the outer paper with about a half an inch buffer.  This is so you can wrap the edges around nicely.   Then I used my spray adhesive to attach the paper to the board.  After gluing the paper to the matte board, it helps to cut the corners off so when you fold things around, it doesn't bunch up.

Then you fold the paper over the edges and glue down.  This face of the board will be on the inside of the cover.  

Then I cut the paper I wanted to be on the inside cover.  it's just slightly smaller than what the matte board was.  This will cover your folded edges quite nicely!


I also wanted to add a nice little touch to the front page of the inside of the book.  We used the ampersand on the wedding favors, and I felt like it was a nice little touch.  I never ended up using the silver letters, mainly because the bride and groom had too many s' in their names, and I would have had to buy 3 or 4 packs of letters!

I gathered my paper and pre-poked the holes for sewing.

I also poked the holes using the same measurements through the cover.

To bind the book, I used the Double Needle Coptic Stitch.  It's very fun technique once you get the hang of it! Check out my tutorial on how to do it here.

You end up with a nice braided effect on the spine of the book when it's all done.

And there's the inside!  The bride and groom loved it, and they'll have plenty of pages to write their own memories as well as include pictures.

Monday, June 17, 2013

Book Making || The Double Needle Coptic Stitch

I've made a couple books over the past few years, including the guest book at a friend's recent wedding.  A few years ago, I wrote up instructions on my old blog.  In the next day or two, I'll post the guest book I created.  But for now, here's the set of instructions I wrote up a few years ago.  Have fun!
------------------------


What you need:

  • Paper
  • Book cover
  • 2 needles- curved is best, but straight works too
  • Thread- The thicker, the wider your spine will be, though the "braided" edge will look nicer!
  • Needle tool or pin
  • Bone folder- this is optional, though you need something to crease your paper to a crisp fold


Setting up:
The paper size. It all depends on the size of your cover. When the book is completed, it is typically ideal to have the cover stick out 1/4 of an inch beyond the paper on all sides except for the spine. This protects the paper, and it looks better. For example: If you have paper that is 8 1/2 x 11-regular computer paper- and fold it in half (hamburger way) for your signature, you will have each signature 8 1/2 x 5 1/2. This means your cover should be 9 x 5 3/4.
PS... a signature is a grouping of paper folded in half to form a mini book.

The pages. The book can have as many pages you want. Just make sure each signature is no more than 10 pages. This is a suggestion so that your pages will each be about the same - folding them makes the outer edge take a zigzag shape. Plus, it makes sewing a bit easier.

The thread. You need one piece of thread for every 2 sets of holes. If you want the binding to have 4 rows of "braided" stitching, you need 2 pieces of thread. Each piece should be about an arm length and a half, though if you are working with a lot of paper, take this into consideration.

The jig. No, it's not a fishing lure. The jig is a piece of paper folded to match the height of your signatures so you can make the holes perfect. It helps to either write TOP on one end, or make some other marking to distinguish the direction of your jig.

The holes. You need an even number of holes. This is because you will be stitching from both ends of the thread. I suggest measuring on your jig so your holes are even lengths away from each other. Say we have our folded computer paper signatures. Remember the 8 1/2 x 5 1/2 one? Since the spine is along the 5 1/2 folded side, for a spine with 4 rows of stitching I suggest doing your holes in inch increments with an inch and a half between the middle holes. Use your needle tool or pin and poke holes where you wish. Make sure your holes are in the same place on your cover as well!
Set your jig on the inside of the fold of your first signature and use your needle tool to poke the holes. Repeat on all signatures.


Binding your book:
Start by taking your first signature and from the inside, thread both needles (one on either end of the thread) through your holes. Now with your thread on the outside of the signature, thread down through the hole of your outside cover, and then back into the hole you just came out of. Repeat with the other hole. Now on the inside of the signature, cross the thread and stitch each needle out of the other hole. The thread should lay flat inside the signature.

Now with your thread on the outside of your first signature, thread each needle into the hole of the signature directly above it. This is the only time you will stitch straight up into the next signature without doing the kettle stitch. Don't worry. It's coming.

On the inside of signature 2, cross your threads and exit through the holes.

The Kettle Stitch. Starting with one of your threads- with the needle, reach down and thread behind the threads between the cover and signature 1, and then back out the other side. It's basically a half hitch (a loop with the end pulled through to create a lock). Thread into the hole directly above into signature 3. Same with other side, and then cross inside signature 3 and exit again.

Rinse and repeat.

After you have added all of your signatures, to add the final cover, exit from the last signature, thread up through the outside cover, and back into the same hole you just exited from. Same with the other side. Now inside the last signature, tie the ends of the thread together and cut.

Fin!

Tips:
Make sure when you are stitching, don't pull too tight as you can rip the paper in your signature. On the same note, make sure to pull it somewhat tight as to keep the width of your spine as tight and small as possible.

Some people wax their thread as to prevent it from getting fuzzy. Hey, paper can wear a thread out if you're not careful!

Jazz it up! If you're feeling kinda plain and want some color in your life, try putting a piece of colored paper on the outside of each signature!

I've never tried it, but I've read that if instead of using one long thread, on the inside of signature 1 you can tie off 2 different colored threads... the "braid" on the spine will alternate colors as you ascend to each signature!

Wednesday, May 29, 2013

Craft time || Making a wedding garter

A good friend's wedding is coming up in the next few weeks, and we're getting pretty excited.  I got my dress in the mail, and it's perfect.  It's one an infinity dresses by BLCouture and it's a perfect fit!  Alyssa picked the lovely color of cantalope (which is very in this spring), and it should look great on all of the bridesmaids!

I've got a few assignments on things to gather for the wedding, and one of them is the garter.  Back when I got married, Moe over at Fivesixteenths taught me how to make the lace and ribbon ruffley while attaching it to the elastic.  Since I had so much fun making it, I thought I'd do Alyssa's the exact same way!  

I pulled out the trusty Singer sewing machine (which the wonderful hubby got fixed over Christmas for me) and went to work.  

I made 2 garters: one to throw, and one to keep.  They both have a heart shaped key and a D for her married name.  Aren't they fun?

Stay tuned.  In a few days, I'll post the making of the Guest Sign in book!  

Tuesday, August 7, 2012

The search for my storefront | Pros and Cons of Etsy

storefront header
The nice thing about a storefront is that it can sell your stuff when you're not able to be in front of someone talking up your wares.  When you can't go sell in person, how else are you supposed to make a living off of your hard work?  Or make room on your shelves for new works?!

So I've been toying with the idea of switching away from Etsy and using a store that can be themed to look like my website... Or even better look seamless.  I've been playing with Storenvy, and I think I like what I've seen so far.  It will take me some time to figure out what I think, but I might make the transition.

I've been with Etsy for quite a few years between Muddy Pup Pottery and KBratcher.  Here are the pros and cons of my experience with Etsy:

Pros:
  • Social atmosphere. Etsy has a great social atmosphere where you can do an easy search and find anything you want.  People can link to each other's shops, find quite a bit of creative inspiration, and stumble across things you love.
  • Easy to build.  If you don't have web experience, have no fear.  It's super easy to upload your pictures, write a description, name your price, and you're good to go!
  • Emails.  On a daily basis I get a themed email from Etsy with products from around the site.  I love seeing what other people are up to.  I don't often get a chance to poke around, and this is a nice way to see what people are making without having to leave the comfort of my inbox.
  • Following.  Etsy already has a great following and large fan base.  Most people have heard about it, and if they haven't, its easy to get hooked on.
  • Consumer friendly.  If someone finds your shop, it's super easy to make a purchase.  They are very clear about shipping being separate for each purchase with each vendor, friendly with credit card transactions, and easy for PayPal users.  

Cons:
  • Lack of customization.  Sure, they've added a page where you can inform your buyers about who you are and what you do, but there is so little room to make your shop look the way you'd like.  
  • Saturation.  The market on Etsy is so saturated that it's tough to stand out.  If you have something that is really unique, you might make it through.  But if you do something that is easy for the general consumer to pick up and learn, you might be S-O-L.  
  • Targeted.  Etsy is very targeted towards women.  If your shop is geared towards guys, you most likely will be making the most sales around Christmas.
  • Expiration.  If you have a listing that goes up and doesn't sell, you need to pay attention.  After a bit the items expire and you have to go in and renew for a fee. 
  • Cost.  If you don't have a chance to do much advertising and don't gross as many sales as you'd hope, you've spent $0.20 to list.  If it expires, you need to pay that to re-list.  If you do get a sale, they take 3.5% of the sale price.  If you pay into the advertising, that is another fee altogether.  $5 in a week will get you about 4,300 impressions.  I'll tell you, I see a lot more action on my shop if I just list a few new things, and that only costs me 20 cents.   
We'll see what happens.  I'll keep poking around and keep you in the loop on whether I switch over or not!  
Until then, keep on keepin on!

Monday, July 16, 2012

Kitchen palette

So I'm getting really excited about the new house.  Yesterday Jason and I found some dishware we really love from Bed Bath and Beyond.  Here are some other ideas for the kitchen that we're thinking about:

Salt Tones for the Kitchen
-Stainless steel appliances- new and already coming with the house!
-How to stain your own cabinets.  I'm thinking about doing a dark color, maybe more of a brown than gray. I think I'll be doing the table in the same color.
-Dishes from Bed Bath and Beyond: Roma Sage
-Idea from Pinterest to turn a thrifted bookshelf into a wine and liquor station!

I can't wait to move in..  I'm so excited.  For now, we pack.


Sunday, July 15, 2012

Message in a [re-purposed] Bottle

This weekend has been quite a whirlwind. Friday night started the packing spree, and now I feel like I live in a cardboard fort! We still have a way to go before next weekend's move, but I feel a bit more confident that I can get it all done with the hubby away. This morning I was poking around the internet and was reminded of a pin on Pinterest a few months ago where someone was using acetone and string to cut bottles. Sounds super safe right? I wasn't able to find the original pin, but I did find instructions:
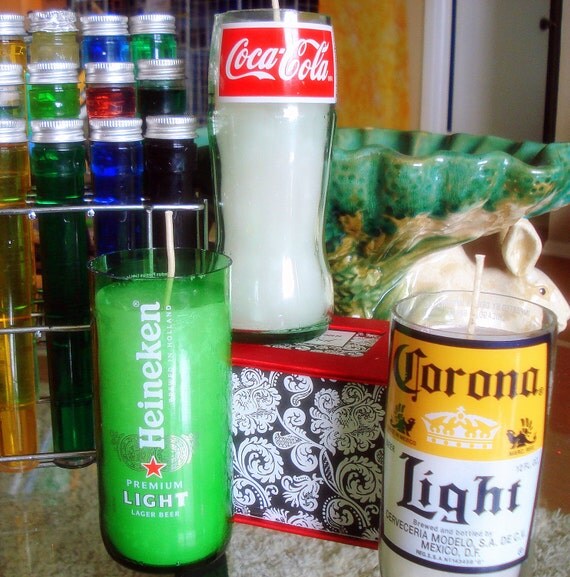
This morning I ran across this neat idea with using beer bottles as tumblers.  They suggested buying a glass cutting kit if you wanted to use them for cups.  My thought- wouldn't these be awesome to put a votive candle in?

Wouldn't these be cool?

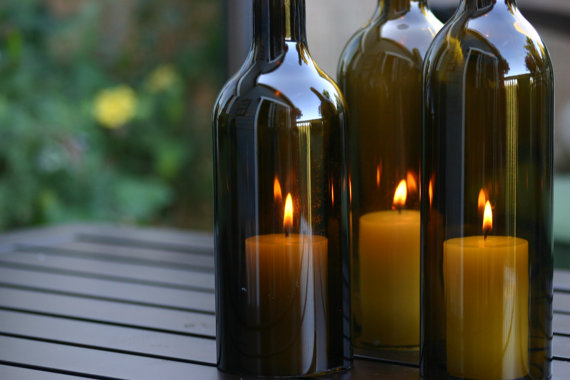
I also ran across these re-purposed wine bottles with the bottoms cut out to make a romantic candle-lit ambiance.


Of course when I get my kiln, we will definitely have a few of these around:


On to another day of good music and packing packing packing!!!!

Song of the hour: Message in a Bottle by the Police.  I couldn't resist with the whole bottle post..  :)


Saturday, June 30, 2012

Who is the Muddy Pup?

Muddy Pup Pottery was inspired by my wonderful pup, Cody.  He's the first dog I've owned since I was a kid, and he is my right side pooch.  He's definitely a mama's boy, and has to be as close to me as possible all the time.  Yes, that's right.  He has a mohawk.  Not always, but he just got a summer cut and we couldn't resist leaving a little bit on top just for fun. 

I got him back in April of 2011, and have been loving every moment of his wonderful fuzzy self ever since.  He's half Shih Tzu, half Yorkie.  We call him a Shorkie, though depending on the day he can also be a Shitshire Terrier.  :)

As for the pottery, I've been playing with clay long before Cody was a twinkle in his real mama's eye.  In college, I started as an Elementary Education major.  At one point I decided it wasn't for me and switched to Art Education.  After another semester, I decided I needed to pursue art and I didn't want to teach.  I started taking all the studio classes I could: Wood working, stained glass, jewelry making, drawing, photography.  I did well in all of them, and none of them were a challenge.  Then, I came across pottery.  It was the first class that I didn't immediately get the hang of it.  It was the first time I had been challenged in any of my art classes.  This is where my passion started.

In college, I couldn't throw round things.  I don't know if it was lack of sleep for 4 years, or a time crunch on getting homework done.  Or maybe it was the police standing over me saying "The building closed an hour ago.. You need to get out... It's not my problem you can't bring your homework home with you."  Or maybe I hadn't yet developed my touch.  Regardless, I began to alter my pieces and explore some really interesting shapes.

If you look at my work then and compare it to my work now, its drastically different.  I would like to say I am a better potter now than I was then, but I think my touch is just more developed.

Throughout the year, my goal for myself is to start pushing the envelope again.  Start playing more.  Don't be afraid to make something totally out there.  Looking back, the 2 pieces that were in the highest demand that I made were juice cups that looked like toilets and a serving platter made to look like a uterus.  Why not push the envelope a bit?


Song of the hour:  I Believe in a Thing Called Love by the Darkness.  Have you ever seen this video?  It's pretty ridiculous.  In an incredibly awesome way.
Related Posts Plugin for WordPress, Blogger...