Showing posts with label home decor. Show all posts

Saturday, February 1, 2014

DIY: Building a decorative shelf || Secretly hiding the TV cords

I had a need to cover up some TV/video game wires, and couldn't find a premade solution.  Here's a peek into the process of building my own shelf, with open insides to hide all those ugly cords!


Back in November, the hubs and I took advantage of some Black Friday sales, and decided to replace our living room TV.  We nick-named it "Bertha," which should give you an idea of why it had to go.  We ended up getting a pretty handsome little Samsung Smart TV from Best Buy, and mounted it above the fireplace on a swivel mount and a sound bar.

We couldn't quite get it centered above the fireplace because of the placement of the studs, but I had a crafty solution up my sleeves.  I got some of those boxy shelves from Target, and filled in the blank space beside the TV.  

One major problem still remained.  I can't stand cords.  I've always been the kind of person to hide them as much as possible, and this was not an easy challenge.  I did some internet research, and found some people who had drilled a hole in the wall and fished the wires behind.  I decided not to take this route for 2 reasons: the TV is mounted on an external wall, and I didn't want to mess up any of the insulation, and running power behind the wall without going into proper electrical wiring could be a major fire hazard.  I wasn't really looking to tear out the drywall and run proper wiring and an electrical outlet.  As a side thought, we also decided that if we want to sell our house anytime in the near future, a prospective buyer may not want an electrical outlet above the fireplace.  

We scoured the local stores for some cord hiding solutions, and nothing really seemed to make them invisible.  We looked at all kinds of options that Lowes and Best Buy suggested, but I wasn't really pleased with any of them.  All I wanted was something to hide the cords, but look like it belonged!  Here's the post that ultimately inspired my design.  This guy did run the cords behind the wall beside the fireplace, but his idea about hiding the cords above the fireplace is exactly what I needed.  

I couldn't find a shelf in the right dimensions, so I got the idea of using crown molding.  I got one decorative piece for the front, and one plain piece (intended for chair rail I think).  I measured the distance I needed to cover, and started cutting!

Here's the cutting device I used.  It's handy when you don't have a wood shop.  The most important part was to be sure that the molding was at the right angle, so the cuts would be right.  


The angles fit just right!


I used the smallest nails I could find, and was very careful to tap the pieces together.  A little wood glue also helped keep the pieces where they belong.


The hardest part of the whole project is waiting for the glue (and later the paint) to dry.

I found these little brackets in the hardware section.  They were the perfect size for what I needed, and would help me make my masterpiece easily detachable from the wall.  I also used a dremel tool to carve out a little crescent on each end of the shelf.  I made them subtle, but still large enough to allow for cords to come out from either side.  

Now for paint!
I used the same color paint that was used on the trim in our house.  This particular hue is called Statuesque and is by Valspar.  It's a really sharp white, and contrasts nicely with the bold colors we used in the floor and walls. 

Voila!  The shelf is very subtle, and looks like it was an original part of the fireplace.  It's large enough to put small knickknacks or candles on, but small enough to be visually pleasing.  


Fin!

Monday, November 26, 2012

Vote for my bathroom! | Birchbox DIY

So I don't know if any of you get Birchbox, but I must say- I LOVE my Birchbox!

Both the hubby and I get monthly Birchboxes filled with fun little treats.  The women's box is usually more geared towards cosmetics, and the guy's box is filled with more manly cleansers, colognes and other useful little items.

This month on Facebook, Birchbox is doing a DIY contest for the best DIY project you've ever done.  Remember our epic bathroom flip after the sewer-mageddeon?  Well, since this is our new favorite room in the house, I figured I'd submit it!

Here's my submission:


The contest is based on votes, so I need your help!
click to vote

Wednesday, November 21, 2012

Even more painting

With everything that's been going on in the Rhine house, life has been a little crazy!  Remember when we had sewer-mageddeon?  Well, we just had the sequel.

But we're making the best of it.

So now that we've had the floor torn back out, we've got a chance to really make a difference in our house.  I'm actually pretty excited to get some good work done in our house.  

Cody did not approve of the giant fans scattered throughout the house.

Now with the fans gone, its new floor, new paint, new doorknobs, and other new little touches all around!
Paint Title
Good bye wall paper!!  Wait, is that more wallpaper under the wallpaper?  The green is what was in the kitchen, and the white with pink and blue flowers was in the hall and stairs.


Here's what we've done so far:
Notice the awesome painted light switches?  Rather than buying new ones, we just took the old ones out back and sprayed them with hammered bronze spray paint.  Voila! 

Have a great turkey day tomorrow!!


Sunday, October 21, 2012

Bathroom- Finished!

So after a long while, I can say we've finished some pretty cool stuff here at the house.  Today, I'll give you a sneak peek of the finished downstairs bathroom.  I think it's my favorite room in the house, and I think the hubby would agree.

So I really don't have any good pictures of before the bathroom makeover.  We intended to do it, and the sewer-mageddeon come up by surprise and motivated us to get things done a bit more quickly.  Here's the in-progess picture:

And here's the finished product:
Vanity, Mirror, Toilet, Paint | Lowes
Towels, Shower Curtain | Target
Scooter | birthday gift from a friend


The vanity is my favorite part.  I love the vessel sink.

Fluffy Towels Reeds | Yankee Candle
Punkin | Target

Halloween soap dispenser | Target

I love that scooter picture.  A good friend gave it to me for my birthday a few years ago.  It was to re-kindle my desire to have a scooter.  

I thought these little boxes were fun.  I bought them for a previous house, but it matches so much better here!

Ceramic paper plane, Bowling ball candle holders, Punkin, Wall cubes | Target


We had to get creative with the toilet paper.  There's not much wall space in this little bathroom, especially with 2 doors into the bathroom:

Thursday, August 23, 2012

Bathroom Makeover

If you had the opportunity to completely re-do a space or two in your house, what would you do?

We all have our dream houses planned out on Pinterest, but how much of it is actually realistic?  Due to the recent sewer-geddeon, we have the chance to re-do the whole bathroom, and at least the floors in the kitchen.  With this comes a lot of thought- Can I work some upgrades into the upstairs bathroom too?  Can we get what we want while still being money conscious enough to pay for the new sewer line?  Will I ever get this awkward smell out of my house?

This is the idea board I've been putting together so far, with some feed back from the hubby too...
Downstairs Bathroom

I really like dark colored wood and bold colors.  I already have the light green trellis shower curtain, and the current tub gets to stay.  Otherwise, the whole room is up for the changing.  I have a few wall hangings from the previous house that were travel themed with some red accents.  I would like to see them in this bathroom, but when it comes down to it, we can really do whatever we want!

Vanities | I like vanities with a little lift.  It makes it seem like a piece of furniture rather than another lego block stuffed in a corner.  The more personality, the better.  Storage is an issue in our house, so it's something to consider.

Lighting | To be honest, the current lighting in the room sucks.  Upstairs, I've noticed when showering that not much light gets over to the shower side, and I'm often showering in the dark.  We need to find something that will spread the light around, yet not be too blinding while you're washing your hands.

Colors | I think I want to go with some fun complimentary colors.  I wanted to work with light greens and reds, but I'm afraid without something else it will come across very Christmasy.  The color combination, compliments of Design-Seeds, gives some warm and cheery colors without being bland.  They make me think of  Italy- even though I've never been there, but its what I would like to think the colors of Sicily would be like.

What would you put in a new bathroom?

Thursday, August 2, 2012

Easy Accents

No, I'm not talking about my fine southern twang.  I'm talking about the simple little things you can do to spruce up your space when you're short on time and cash.
easy accents frame

Speaking of easy accents, check out my guest post on Five Sixteenths Blog: Today Moe let me tell all of her readers about how I changed out all of my light switch covers and outlet covers for fancy hammered bronze ones for less than $5.  Check it out.


Instead of filing those scrap books away on a shelf, why not have them hanging on the wall?  These are plate hangers!

What about accenting your thermostat with a picture frame?  I just picked one up and Big Lots and spray painted it.  I'll let ya know how it turns out.  This one I found on All Things Homie:

Or what about these cute tiles?  Totally customizable, and you can get cheap tiles from the Habitat for Humanity ReStore!  I found this little tutorial on The Huckaby's Happily Ever After


Tuesday, July 31, 2012

Missing in Action? or Moving Insanity & Awesomeness?

So I've been a bit M.I.A the past few days (weeks really), and this is what I've been up to:
The hubs and I bought a home, and then the next day he left for a temporary deployment.  That weekend, I rented a huge Uhaul (and realized how tiny I am), moved, replaced the deadbolt and door handle, had a friend correct my unfortunate door handle attachment job, installed internet, got new couches, painted the bedroom, half way painted the bathroom, and then went to a weekend long music festival.  Hey, when I get going, I don't slow down!

I'm really pleased with the way the bedroom has turned out so far.  I did 3 walls with Smoked Oyster, and an accent wall in Gypsy Rouge.  
I also spray painted the outlet covers with a hammered bronze color and added lamps.  The paper lamps are probably one of my favorite parts of the room- we plugged them into a wireless light switch, and mounted the switch on the back of the headboard for an easy way to turn off the lights at night.


This past weekend, I got the chance to go to Floydfest 11.  The weekend was filled with good food, great sangria (I'm not really a beer drinker) and fantastic music!
We listened to music way into the night and heard great bands like Matisyahu, SOJA, Punch Brothers, David Wax Museum, and more.

It's been a crazy past few days, but I'm glad to start getting back to normality again.  
Songs of the week: Since it's been a while, I'll call out this past weekend, and the one before it.  For moving weekend, Little Help From My Friends by the Beatles.  For my weekend of music and camaraderie, we have One Day by Matisyahu.

Monday, July 16, 2012

Kitchen palette

So I'm getting really excited about the new house.  Yesterday Jason and I found some dishware we really love from Bed Bath and Beyond.  Here are some other ideas for the kitchen that we're thinking about:

Salt Tones for the Kitchen
-Stainless steel appliances- new and already coming with the house!
-How to stain your own cabinets.  I'm thinking about doing a dark color, maybe more of a brown than gray. I think I'll be doing the table in the same color.
-Dishes from Bed Bath and Beyond: Roma Sage
-Idea from Pinterest to turn a thrifted bookshelf into a wine and liquor station!

I can't wait to move in..  I'm so excited.  For now, we pack.


Sunday, July 15, 2012

Message in a [re-purposed] Bottle

This weekend has been quite a whirlwind. Friday night started the packing spree, and now I feel like I live in a cardboard fort! We still have a way to go before next weekend's move, but I feel a bit more confident that I can get it all done with the hubby away. This morning I was poking around the internet and was reminded of a pin on Pinterest a few months ago where someone was using acetone and string to cut bottles. Sounds super safe right? I wasn't able to find the original pin, but I did find instructions:
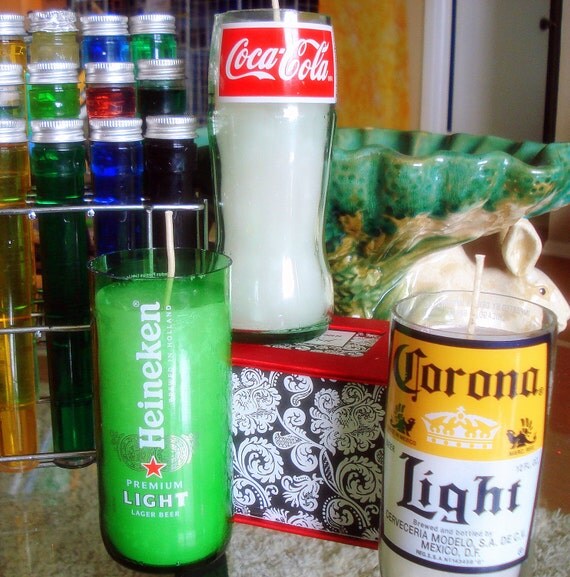
This morning I ran across this neat idea with using beer bottles as tumblers.  They suggested buying a glass cutting kit if you wanted to use them for cups.  My thought- wouldn't these be awesome to put a votive candle in?

Wouldn't these be cool?

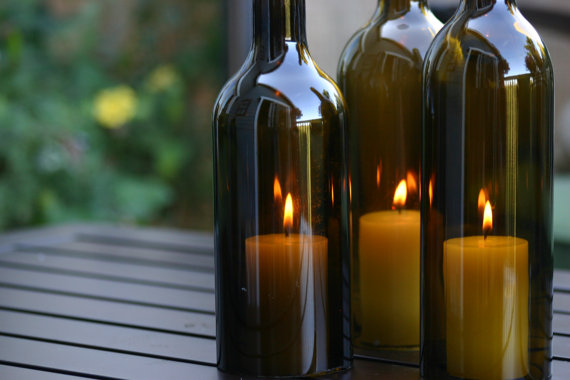
I also ran across these re-purposed wine bottles with the bottoms cut out to make a romantic candle-lit ambiance.


Of course when I get my kiln, we will definitely have a few of these around:


On to another day of good music and packing packing packing!!!!

Song of the hour: Message in a Bottle by the Police.  I couldn't resist with the whole bottle post..  :)


Related Posts Plugin for WordPress, Blogger...